
 By Ammar Sabilarrohman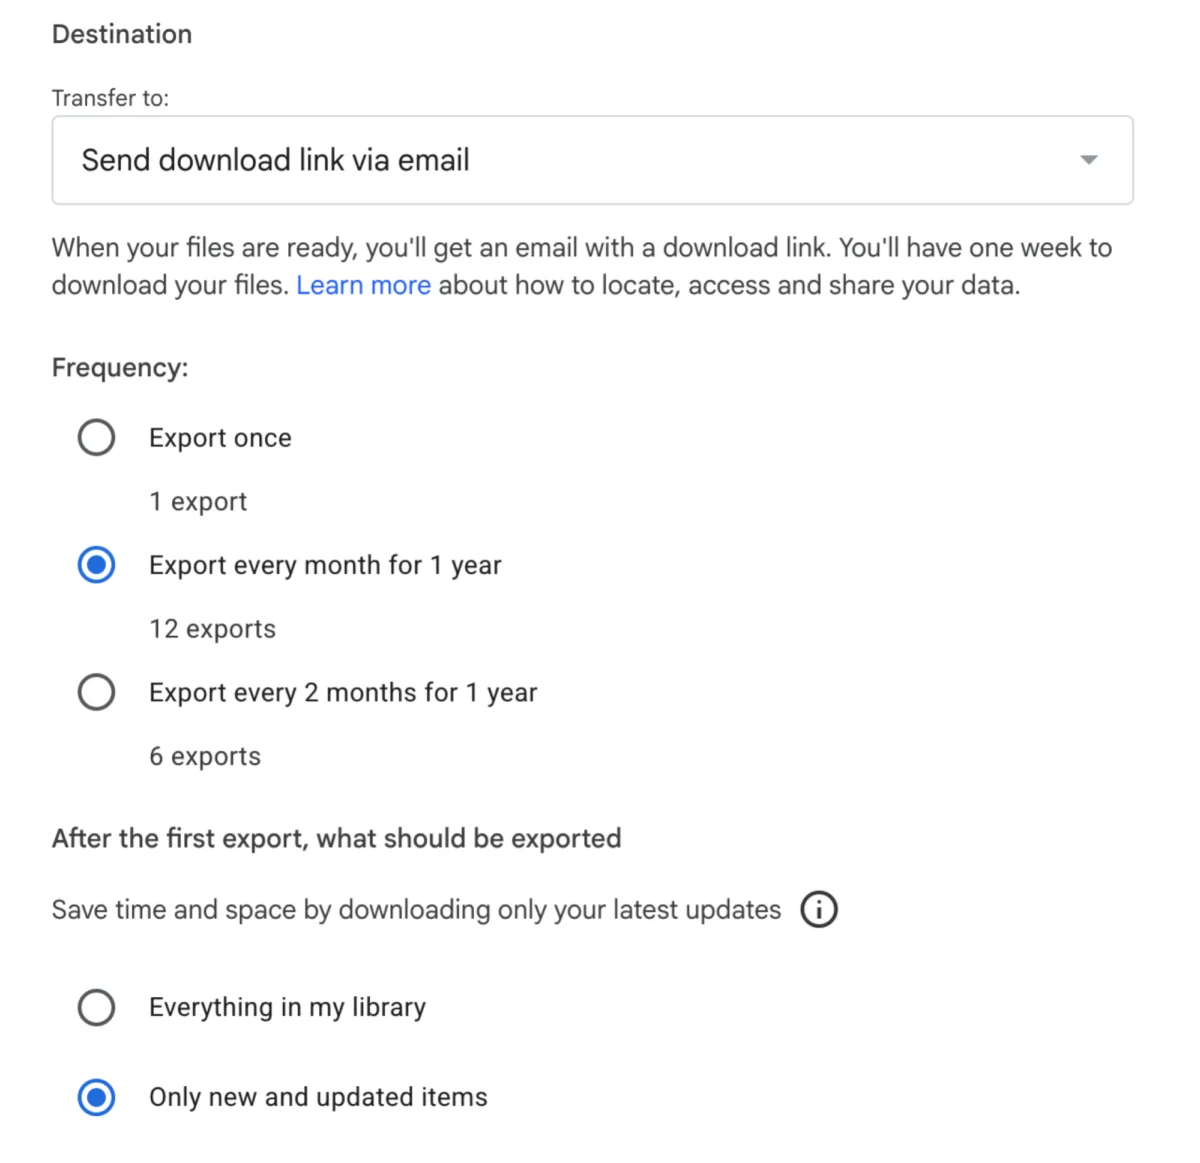
By Khamosh Pathak | Published: September 11, 2026
Google Photos is one of those foundational applications that millions of users set up once and promptly forget about. In its default state, the service functions as an effortless, silent repository for our digital lives—automatically sucking in screenshots, selfies, family moments, and blurry pictures of receipts.
However, beneath its seemingly straightforward interface lies a vast, complex ecosystem of settings, AI-driven automation, and storage management tools. Left unconfigured, a Google Photos library can quickly devour your allotted cloud storage, surface unwanted memories from past relationships, or clutter your search results with unwanted artificial intelligence prompts.

Whether you are looking to reclaim precious gigabytes of storage, tighten your digital privacy, or completely bypass Google’s aggressive push toward Gemini-powered search, mastering these ten essential Google Photos hacks will transform the application from a passive storage bin into a tailored, efficient tool.
1. Maximize Cloud Capacity with Storage Saver Mode
For years, users enjoyed the luxury of unlimited photo and video backups, but those days are long behind us. Today, users must carefully manage their data within the confines of Google’s free 15GB tier or pay for a monthly subscription upgrade. If you are rapidly approaching your storage limit—and you care less about archiving lossless, raw files than you do about keeping your Gmail and Google Drive accounts operational—Google’s Storage Saver mode is an absolute necessity.
When activated, Storage Saver automatically scales down incoming media during the backup process. Photos are compressed to a very respectable 16 megapixels, while videos are capped at 1080p high definition.

- How to enable it: Navigate to Settings > Backup > Photo and Video Quality, and switch your preference to Storage Saver.
- Note: This setting only applies to future uploads, meaning the sooner you implement this change, the more long-term storage space you will preserve.
2. Reclaim Your Digital Peace of Mind with ‘Hide Faces’
The automated Memories feature in Google Photos is designed to pull at your heartstrings, stitching together older photographs and videos into curated, nostalgic slideshows. Unfortunately, the algorithm lacks human emotional context. It frequently backfires by unexpectedly resurfacing painful reminders—such as photographs of an ex-partner—right in the middle of your workday notifications.
Fortunately, Google has built robust customization tools directly into the Memories architecture. You can manually instruct the algorithm to prioritize specific people, family members, or pets, while actively blocking others from ever appearing in your daily feeds.
- How to enable it: Go to Photos Settings > Preferences > Memories > Hide Faces. From there, you can select and block specific facial recognition profiles to ensure they never pop up uninvited again.
3. Securely Back Up Your Most Sensitive Media in the Locked Folder
Privacy-conscious users have long relied on the Locked Folder feature within Google Photos to shield sensitive images and confidential documents behind a biometric wall or a secure PIN. By default, however, items placed in this folder remain strictly local to your physical device. If your smartphone is lost, stolen, or accidentally factory-reset, all of the media stored within your Locked Folder is permanently gone—even if the rest of your library is safely backed up to the cloud.

Google includes a hidden setting that bridges this security gap, allowing your locked media to sync safely to the cloud while maintaining its encrypted, sequestered status away from your main photo feed.
- How to enable it: Head over to the Collections tab, scroll all the way to the bottom, and select Locked Folder. During the initial setup, you will be prompted to enable cloud backup. Alternatively, open an existing Locked Folder, tap the Cloud icon on the top toolbar, and toggle on Back up Locked Folder.
4. Compress Existing Uploads to Free Up Your Free Tier
If you are already well over your storage limit and want to avoid upgrading to a pricier Google One tier, tackling your future uploads with Storage Saver mode isn’t enough. You need to deal with the backlog. Google provides a utility called Recover Storage that sifts through your existing cloud repository, compressing older photos and videos down to Storage Saver dimensions.
Because this tool performs heavy-duty asset management across your entire account, it cannot be initiated from the mobile app.

- How to execute it: Open a web browser and navigate to the official Google Photos website. From the left-hand sidebar, select Storage, and click Learn More underneath the Recover Storage heading. Check the I Understand box, and click Compress existing photos & videos to begin the mass-compression process.
5. Audit Your Device Folders to Stop Unwanted Auto-Uploads
The Android version of Google Photos possesses deep integration with the local file system, granting it permission to scan and upload media from virtually any directory on your device. While this is convenient for capturing your main camera roll, it can accidentally flood your cloud account with clutter from Chrome downloads, temporary internet caches, or WhatsApp media folders (especially if you already maintain a separate online backup system like Google Drive).
Taking control of your device folders ensures that only meaningful, intentional photography consumes your data plan.
- How to execute it: Navigate to Photos Settings > Backup Settings > Default backup > Device folders. Review the comprehensive list of directories on your device, toggle on the folders you want actively backed up, and deselect any unnecessary clutter.
6. Purge Clutter Fast Using Storage Management Tools
If your cloud storage is choking on low-quality digital noise, Google’s centralized storage management interface can help you reclaim gigabytes in minutes.

- How to execute it: From your app’s main settings, navigate to Backup > Manage storage. This redirects you to the broader Google One management hub. Under the "Clean up by service" section, tap into the Google Photos utility. Here, Google intelligently categorizes media into helpful tabs: large video files, blurry images, duplicate snaps, and unwanted screenshots. Simply select the items you wish to purge and tap Delete at the top of the screen.
7. Don’t Forget the Bin: Empty Your Trash to Actually Free Up Space
One of the most common points of confusion for users purging their libraries is noticing that their cloud storage counter hasn’t dropped after deleting hundreds of large files.
Google retains deleted media in a temporary holding state for up to 30 days to protect users from accidental data loss. Until that holding period expires—or you manually intervene—those files continue to count against your storage quota.
- How to execute it: Scroll to the bottom of your app, locate the Collections section, and choose Trash (or Bin). Tap the three-dot menu button in the corner, select Empty Bin, and confirm your choice by tapping Delete Permanently.
8. Reclaim Traditional Search by Disabling ‘Ask Photos’
As Google races to integrate artificial intelligence across its entire software suite, Gemini features have begun creeping into unexpected places. In Google Photos, this is most evident in the Search tab, where the newly introduced Ask Photos feature attempts to handle queries using conversational AI.

While some users appreciate advanced generative search capabilities, many find that it introduces latency, complicates basic queries for specific locations or dates, and surfaces unwanted AI suggestions. Fortunately, Google has provided a global kill switch for these integrations.
- How to disable it: Go to Photos Settings > Preferences > Gemini features in Photos, and toggle off the Ask Photos feature. While you are there, you can systematically disable all remaining Gemini prompts within the app to restore a clean, traditional user experience.
9. Schedule Incremental Google Takeout Exports for Local Redundancy
A robust, fail-safe digital archive should never rely exclusively on a single cloud provider. Google Takeout allows users to download a comprehensive offline copy of their data. Historically, however, Takeout suffered from a major flaw: every single time you initiated an export request, the system downloaded your entire library from scratch, rather than just the new additions.
Google has since updated the platform to support incremental exports, making local redundancy practical for everyday users.

- How to set it up: Visit the Google Takeout website, sign in, and deselect everything except Google Photos. Choose your target albums, hit Next, and locate the Frequency drop-down menu. Select an option like Export every month for 1 year or Export every 2 months for 1 year. Most importantly, make sure to switch the delivery parameter to Only new and updated items to activate incremental backups.
10. Pivot to Amazon Photos for Automated Desktop Monitoring
For creative professionals, photographers, or power users who prefer editing images locally on a Mac or PC before syncing them to the cloud, the lack of robust desktop folder monitoring in Google Photos remains a significant frustration. Google once offered a dedicated desktop backup client, but that utility has long since been retired.
If seamless, background desktop folder monitoring is a non-negotiable part of your workflow, switching to Amazon Photos is a viable alternative. The dedicated desktop application operates silently in the background, continuously monitoring designated computer folders and uploading new files automatically. Furthermore, users subscribed to Amazon Prime receive unlimited, full-resolution photo storage alongside 5GB of dedicated video storage at no additional cost.
 Asro
Asro  Reynand Wu
  Siti Muinah